
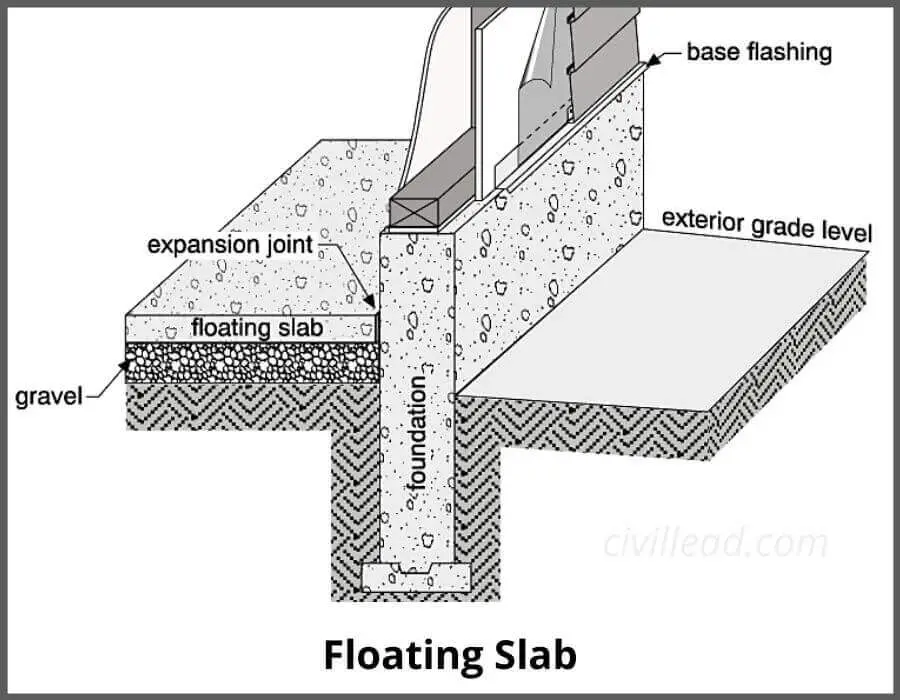
The concrete slab is known as the floating slab are positioned over the ground without any kind of fastening so that it appears as it is floating.
The term “floating slab” refers to a structure that looks like a plate that is simply placed over water with no connections of any kind.
In this article you’ll learn:
So, if you’re ready to go with it, this article is for you.
Let’s dive right in.
What is a Floating Slab?
For the foundations of many different structures like sheds, car garages, additions, cottages, floating slabs are used.
The slabs lack frost footings but have a reinforced edge that has been thickened.
They are referred to as “floating” because they are permitted to move as a single, monolithic unit above the frost line.
Construction of Floating Slab:
Before the building of floating slabs, the planned project must have a sturdy base that can support the entire weight of the superstructure.
The steps involved in construction are as follows:
A: Excavation of the Site:
Clearing the soil and excavating the area in accordance with the plan are the first steps in the building of floating slabs.
In this step, the sides must also be made with drainage so that water can exit through the gravel base.
To prevent water from getting near the concrete slab foundation, the trench is sealed with gravel and geotextile.
B: Laying a Gravel Base for Drainage:
Earlier to pouring gravel, install a gravel grid.
Add a base of 8–12 inches of gravel with a range of rock sizes, compacting each layer for sturdiness.
C: Slab Reinforcement:
For the casting process, the slab mould is put in place.
The standards and specifications give the reinforcing bars to strengthen the slab.
D: Casted Floating Slab:
The concrete is poured into the slab formwork.
Depending on the region and workmanship, either a mechanical vibrator or my labour is used to compact it.
In order for the slab to be fully productive, proper compaction must be carried out.
A proper cure must be subjected for roughly two to three days.
How to Build a Floating Slab?
Step: 1 Prepare a slab for the first floor:
The four stakes should first be driven into the four corners of the floating slab.
A line, level, or builder’s level can also be used to determine the slope of the ground at the construction site.
If the land needs to be flattened because of an excessive slope, the cost of building will increase.
Therefore, make an effort to remove the slab’s top side and cover the lower side with soil.
As it settles in the same location, the expense of transferring soil from the side will decrease.
Step 2: Mark and Position Lever on Side:
Prepare a 212-inch-long wooden board form or join it with a dowel in order to mark one face of concrete forms and fix it with corner stakes.
Level a 2×12 wooden board, and secure it to the second slab corner.
For building 5-inch-thick slabs for garages and sheds, 212 boards work well.
Step: 3 Complete the side forms and stake bracing:
Attach the Manson line to the top of the 2 x 12 wooden board.
A 2×12 board should be aligned to the string, and it can be braced or fixed by pairs of 2x4s spaced every two feet.
Forms are reinforced to guarantee that the sides stay straight during concrete pouring.
Due to the potential for fresh concrete to push these boards outside, the sides of the flooring slab are curved.
Step: 4 Level it and fix the other side with a stake:
Create a second 2 by 12 wooden board that is the same width as the slab.
Utilizing the diagonal length calculation, secure one side end with a braced form and put it at a 90-degree angle.
To level it and support the second wooden board form, drive stake fixers into the end.
The third and fourth sides of the floating slab formwork should also be added.
Step 5: Levelling and Filling:
Fill the forms with 3 inches of granular soil, leaving a 5-inch space at the top.
Correctly level and tamp this fill.
After filling, we must ensure that the entire slab area has the 5-inch margin left out.
For that stretch, measure the distance using the thread that runs between the tops of the two shapes in various places.
Step 6: Compress the Fill:
To properly compact the earth, use a plate compactor.
Left 12×12 To thicken the slab’s edges, dig a deep, wide trench around them.
Step: 7 Add Steel Rebars to Strengthen the Foundation:
Spread a plastic covering 5 mm thick over the entire slab area at this point.
Fix two 1/2-inch-diameter steel bars to a stake, maintaining a wooden board from the job at least 4 inches away.
Step: 8 Slab Partition setup:
On a plastic sheet, arrange the steel bars in a grid, spacing them apart by at least 4 feet.
Use 2×4 wooden boards to divide the slab into several sections.
Maintain alignment of this board by stretching a string between the top edges of 2×12 wooden boards.
Step 9: Determine the Concrete Volume:
Calculate how much concrete will be required to finish the pour by multiplying the length, breadth, and depth of the floating slab.
The concrete volume in cubic feet will be provided.
Divide the volume of the concrete by 27 to see how much there is in a cubic yard.
Order your ready-mix concrete at least one day before casting the slab.
Step: 10 Pour concrete and level it properly:
Make use of a wooden screed board to level the concrete and smooth its surface.
To properly polish the concrete surface, make several passes over it.
Step: 11 Create circular concrete edges:
With the aid of an edging tool, concrete slab edges can be rounded off.
Do not forget to complete this task once the surface water on the concrete has evaporated.
Step 12: Place the Anchor Bolts:
Place 1/2-inch diameter anchor bolts six feet apart.
Maintain a bolt’s height above the concrete surface of around 2.5 inches.
Step 13: Prepare the Concrete Expansion Joints:
By employing groover tools, create an expansion joint in concrete to prevent random track.
Step: 14 Cure it properly and let it harden:
Give concrete the required water curing for 24 homes, and let it strengthen enough.
A curing ingredient can also be used to hasten the curing process.
Step: 15 Take Forms Off Properly:
Carefully remove concrete forms as it is not damaging the slab.
Fill up any gaps in the concrete with a rich cement mortar mixture.
Advantages of Floating Slab:
- When soil treatment would be useless or have a low load-carrying capability, the floating slab construction could be used instead.
- The vertical loads or strains that are applied to a floating slab can be distributed across a wider region.
- The use of footer trenches is not necessary with floating slabs, as trenching or digging can be used to pour them, which is more affordable.
- The ground layer under the floating slab is not disturbed in any way, and neither will the quality be affected.
- The floating slabs are ideal for locations where the soil layer may shift because of high moisture content.
Disadvantages of Floating Slab:
- The floating slab does not offer subsurface land for extending connections to utilities for access below ground.
- It uses outdated technology.
- Foundations with floating slabs have less design resonance.
Also read: Ribbed Slab | Types of Slabs | Flat Slab | Sunken Slab | Concrete Slab
Conclusion:
When a house needs to be expanded, the floating slab is the finest choice.
It is incredibly simple and affordable to add an existing house without having to slash it down.
Related Posts
Rock Quality Designation(RQD): Building Strong Foundations
Spread Footing
Masonry Cement
Plain Cement Concrete
Concrete Efflorescence
Concrete Pile
Stepped Footing
Fineness Modulus of Coarse Aggregates
Difference between Condo and Apartment